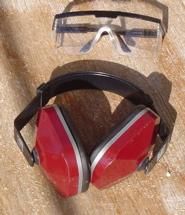
Safety Gear
Don't even think of working on EMT (Electrical Metal Tubing) without eye
protection! And, cutting EMT with a saw makes a lot of noise, so
wear ear protection too. I wear ear protection when I use a grinder too.
|
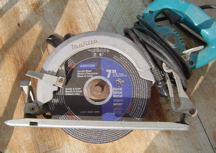
Saw
This is a Makita worm-drive circular saw with a special metal cutting
abrasive disk. It cuts through EMT easily. Each cut wears the disk down
a little bit. After about 100-150 cuts you'll need a new one,
but they're pretty cheap (about $5).
|
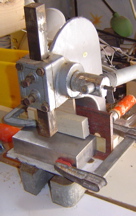
1-Ton Arbor Press
This is an arbor press. Click the picture for a bigger view so you can see
how this one is configured.
- It is bolted to my bench top through a hole in the back (not shown)
so that it doesn't lift off the bench when I use it.
- I've placed a large chunk of angle-iron steel onto the base.
- I've placed a large block of aluminum onto the angle-iron base.
- I've used wood shims to adjust the exact depth of the space under
the press (the vertical column of steel -- it moves up and down). The
depth is adjusted so that the correct amount of the pipe gets crushed.
There are more details on its adjustment later.
- Everything is clamped so it doesn't move.
In fact, you could also use a vise to crush the ends of the pipe, but I
like using the press -- it is much faster and very accurate when set up
properly.
|
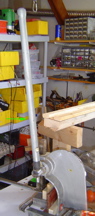
Extension Arm
The arbor press I bought came with a puny 1' long arm. I actually used it
to build the first dozen or so struts of the first dome I ever made, and I
thooght my arm would fall off. Get a 3' length of steel pipe and put it
over the short arm that comes with the press. I've used the arm from a
pipe-threading tool. It was hollow and had a nice smooth end.
|
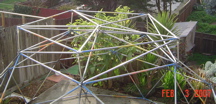
The Nosefish Dome Deck Structure
This is the first half of the project: the dome deck structure. It is
shown here completed and installed on top of my 2v "optimal" dome. The
2v "optimal" dome is sized so that the length of the two strut lengths
adds up to 10' (minus a blade kerf -- the amount the blade destroys, which
is about 1/8" if you are using the cut-off abrasive disk mentioned above).
Here are the names I've given to the parts in the dome deck structure:
- Riser
-
There are five risers in the dome deck. They are the short, vertical
struts that go up from each of the five verticies in the pentagon that
forms the top of the dome itself. These should be made from 3/4" conduit.
I layed a length of uncut EMT across the top pentagon of my dome and
measured the distance between the bottom of that EMT and the top of
the dome. I foolishly figured that that would be the length of the riser.
I was wrong, but, as you will see later, it turned out not to be a tragic
mistake. What I failed to account for was that the angle-brackets
add some length to the risers. I made my risers 14.5" high (which meant
that I cut them at 16.5" so there would be 1" from the end of the riser
strut to the center of the hole I would drill in each end.). I ended up
needing to add a spacer of about 2" on top of the center vertex of
the dome so that the radial deck supports would be exactly horizontal.
So, I really should have cut my risers at 14.5" for an effective height
of 12.5".
- Deck Pentagon
-
The deck pentagon is the same size as the pentagon at the top of the dome.
It is connected to the dome's top pentagon by the risers. The length
of these struts are the same as the length of the top pentagon of the
dome. You'll need five of these. They should be made of the same size
conduit as your dome (presumably you have used 3/4" conduit for your dome).
- Deck Diagonals
-
The deck diagonals connect the bottom of one riser to the top of the next.
You must be certain that they are all "bottom-to-top", so that two deck
diagonals never meet at the same bottom or top of a riser. I calculated
the length of the deck diagonals using the pythagorean theorem. My
top pentagon struts were 61" hole-center-to-hole-center, and my risers
were 14.5" hole-center-to-hole-center, so my diagonals were 62 11/16".
These should be made from 3/4" conduit.
- Radial Deck Supports
-
The top of each riser is connected to the center bolt of the dome with a
radial deck support strut. These end up supporting the deck as well as
making the deck structure rigid. I actually assembled the rest of the
dome deck structure without the radial supports, and then measured how
long they needed to be. Mine are 52" long.
These should be made from 3/4" conduit.
|
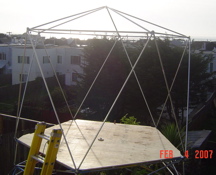
Deck and Shade Structure
This is the second half of the project: the plywood deck and a 1v dome on
top that supports a shade cover. The 1v dome is made from 1/2" conduit.
Here are the names I've given to the parts in the dome deck structure:
- Plywood Deck
-
The plywood deck is made from two sheets of plywood. A hole in one of the
cut pieces goes over the center bolt.
- Wall Struts
-
The 10 struts that seem to spring from the corners of the plywood deck
form the walls of the 1v dome. I made mine long enough so that I could
stand on the deck and see under the "roof" pentagon. Mine are 75.625"
long. The length is not critical, aside from the fact that all the wall
struts must be the same length as each other.
These are made from 1/2" conduit.
- Roof Pentagon
-
The roof pentagon is at the top of the 1v dome. It is actually the same
size as the deck pentagon and the pentagon at the top of the dome.
These are made from 1/2" conduit.
- Roof Radials
-
The five struts which connect together in the top center of the 1v dome
complete the structure. The shade cover will be supported by these.
I used the pieces left over from cutting the roof pentagon for the roof
radials (think "zero waste!"). This made my roof flatter than a normal
1v dome, which for this application is a good idea. You don't want a
big sail area to catch the wind.
These are made from 1/2" conduit.
|
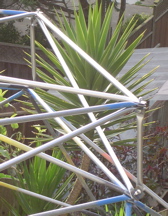
Riser
Here you can see a riser. Click the picture for a bigger version -- it is
easier to see what is going on. The bottom of the riser is connected to
a vertex in the top dome pentagon. I built my dome with the bolts in
these verticies pointing "out" so I could attach the right angle brackets
without disassembling the vertex.
You can see that the angle-bracket at the base of the riser is arranged so
that the riser can rotate with respect to the angle-bracket. The angle
bracket itself is in the same plane as the vertex, but the riser is
free to point vertically. Use a 1" bolt to attach the riser to the
bracket at the bottom and top.
You can also see that the angle-bracket at the top is is arranged so that
the second bolt goes straight up. Use a 2" bolt pointing up.
|
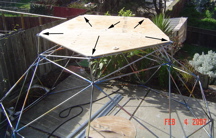
Plywood Deck
The plywood deck does not cover the "points" of the pentagon -- they are
exposed. When it comes time to attach the 1v shade dome, you'll attach an
angle bracket in each exposed vertex of the deck. Doing it that way means
you can use the deck pentagon as the base of the 1v shade dome, which
means 5 fewer struts to cut, and carry with you, set up, take down, etc.
|