Overview
You can build your own external hard drive for less money than you can buy a pre-packaged one. Also, you may find that you do not even need hard drive enclosures at all. With a "Hard Drive Dock" you can simply insert a hard drive and treat it as removable media. This is excellent for creating complete backups of your computer, for example to keep an off-site backup.
Products to Consider
All prices and capacities were current on the date of writing this article, 4/25/2010 but they will certainly change as time goes on.Disclaimer:
I have no association with amazon.com, Vantec, Seagate or Boxer, nor do I earn any kind of commission or incentive of any kind should you purchase any of these items. I purchase items from amazon.com and have been very happy with their almost instant 24x7 customer service. Your mileage may vary.There's always some fine print. This is it.
Hard Drive
First, you need to purchase a hard drive. I recommend a Seagate hard drive. Here is one that I purchased recently.
Seagate Barracuda 7200.12 1.5 TB SATA 32 MB Cache Bulk/OEM Hard Drive
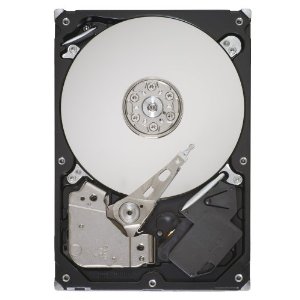
$99.99 with free shipping from amazon.com
External Enclosure
If you want to leave the drive connected to your computer you might want to use a dedicated enclosure. It will connect to your computer via a USB 2.0 connection.
Vantec NexStar 3 NST-360SU-BL 3.5-Inch SATA to USB 2.0 and eSATA External Hard Drive Enclosure
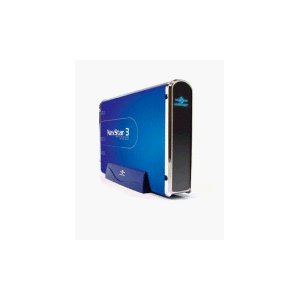
$37.94, elegible for FREE Super Saver Shipping from amazon.com
In fact, any SATA II to USB enclosure will work, and there are plenty to choose from. I have used this enclosure for years and it has performed well for me.
Screwdriver Set
If you plan to use an enclosure like the above then you'll need a tiny #1 screwdriver. You might consider one of these inexpensive screwdriver kits with interchangeable bits of many different types (flathead, phillips, torx and hex). I own two of these kits and love them because the tips are magnetic and hold onto the screws:
Boxer 30 Pcs 4mm Precision Screwdriver Set
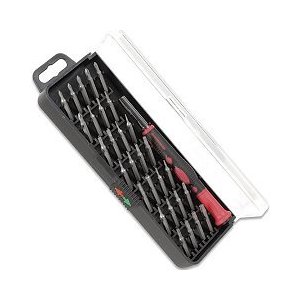
$9.82, elegible for FREE Super Saver Shipping from amazon.com
Hard Drive Docks
However, a more flexible approach is to use a hard drive dock. This is especially useful if you think you might need more than one external drive and to change them out from time to time, e.g. as part of a backup rotation scheme or offsite backup scheme. For example:
Vantec NexStar NST-D100SU 2.5-Inch/3.5-Inch SATA to USB 2.0 and eSATA Hard Drive Dock
(holds one hard 2.5" [laptop] or 3.5" [desktop] drive)
$34.99, elegible for FREE Super Saver Shipping from amazon.com
Vantec NexStar NST-D200SU 2.5-Inch/3.5-Inch SATA to USB 2.0/eSATA Dual Bay Hard Drive Dock
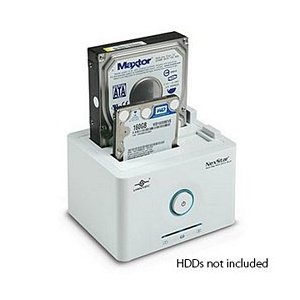
(holds two hard 2.5" [laptop] or 3.5" [desktop] drives, or one of each)
$59.99, elegible for FREE Super Saver Shipping from amazon.com

In fact, any SATA II to USB or Firewire hard drive dock will work, and there are several to choose from. I have used the single drive dock myself for over a year and it has performed well for me.
Hard Drive Dock vs. External Enclosure
The Hard Drive Dock approach has the advantage of not requiring a screwdriver to assemble the enclosure. Just plug the drive in firmly. But, you must remember that the hard drive is vulnerable when it is not in the dock. When it is not in its dock you must always keep hard drives in the shiney plastic bag it was delivered in. This special bag prevents static charge from damaging the drive. And the bag will also protect the drive against minor moisture damagae, such as a spilled cup of coffee, etc. When handling the drive, hold it only by the sides -- never touch the exposed circuits, connectors, etc.An enclosure has the advantage of protecting the drive well and if you never intend to swap the drive out and don't need to use multiple external drives it is probably a more stable and aesthetic choice. It is arguably less vulnerable to drive damage due to spills, etc. It's a good choice for a drive you intend to share over your network with other computers because you will not mistakenly remove it from the dock when it comes time to make a backup, etc.
Assembling an External Enclosure
For a complete pictorial tutorial on assembling an external hard drive
like the one listed above, see here:
Step-by-Step InstructionsHere is a quick summary:
First, before you open up the plastic bag containing the hard drive, touch an electrical ground such as a metal part on your mac. Now open up the plastic bag containing your hard drive and touch the metal part of your mac and then, while still touching your Mac, also touch the side of drive inside. Then, while still touching your Mac, also touch a metal part of the external enclosure (not a chrome plastic part!)No, this isn't a mind-meld maneuver, nor is it balancing their karmic potential. It is ensuring that you have no static electric charge on you and that you don't damage the hard drive with a static shock.
If you do decide to build a drive with an enclosure, you will need a small philips head screwdriver. All external enclosures work a little differently but essentially they are all very similar inside. Open the case and you'll see there is a place where the hard drive simply plugs in. You will also find there is a simple way to secure the hard drive inside the case with two or four screws. Tighten them until they are snug but do not over-tighten them. They are mainly there to keep the drive from becoming unplugged inside the enclosure. You will also find a tiny connector plug, usually with two or three small holes. You will probably have to put the enclosure most of the way together before you can plug this into two or three corresponding pins on the other piece of the enclosure. Not all enclosures have this, but many do. This is what makes the enclosure light up to show you the drive is on and/or being accessed. Finally, mate the two sides of the enclosure and secure them with the remaining, tiny screws.
Initializing an External Drive
Regardless of what kind of means you use to hold your drive (dock or enclosure) Plug in the power supply and connect the dock or enclosure to your computer with a USB 2.0 cable. Some enclosures also have a Firewire 400 or Firewire 800 connector. Once you make this connection your Mac will recognize the dock or enclosure, but it will not be able to directly use the hard drive It will report that the drive cannot be recognized and will ask if you want to initialize it.
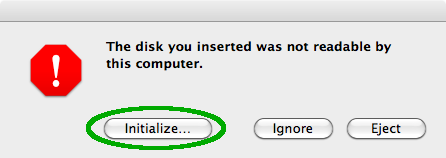
Click "Initialize" and your Mac will open up Disk Utility for you. You can also find Disk Utility in the Applications->Utilities folder. The drive is not yet initialized -- you will need to configure how it is initialized in Disk Utility.
One Volume or Many?
After selecting the drive on the left (be sure to select the right one!!!!!) you either click the "Partition" tab at the top of Disk Utility to configure how the disk will be initialized.You have a few choices to make about how the disk will be initialized. The first big choice is whether to set it up as one logical volume or to divide it up into smaller logical volumes. Multiple logical volumes means that the physical hard drive will seem to contain more than one logical hard drive drive, each with its own name and dedicated size.
There are many possible reasons for dividing up the external drive, but whatever your reasons, be aware that you cannot change the partitioning without erasing the drive and starting over. You cannot add or remove partitions and you cannot change their size without losing all data on the drive.
Here are some potential reasons to partition the drive:
- For backups, create partitions that are exactly the same size as your computer's hard drive. Then each partition can hold one copy of your hard drive.
- If you use a partition as scratch (temporary space) you can be assured
that only the amount of space in that partition can be used. Once it is full
whatever is trying to use more will fail. This is useful because perhaps you
have other applications using space on other partitions that you don't want to
suffer in case the temporary space gets used up.
- If you use smaller partitions you may be able to back them up with
smaller hard drives you already own.
- You can easily share some volumes from the drive over your network, while keeping the others private, even though they are physically on the same hard drive.
Some arguments against partitioning include:
- There is still only one physical hard drive, so access to each of the
different partitions competes with each other. If you need better performance
you will need to use separate hard drives on separate USB legs (e.g. plugged
into different USB ports on the back of your computer.) The drive is faster
than your USB hub, so placing multiple hard drives on the same usb leg (e.g.
plugging them into a hub together) just makes them compete for USB bandwidth.
- You cannot change the size of partitions without erasing the hard drive.
This is never a problem if there is only one partition and you use different
directories for files instead of different partitions.
- When there is more than one volume on a drive you must eject them all before you can safely remove the drive from its dock, unplug its USB cable or turn it off. Failure to do so can lead to corruption of one or more volumes. However, OS X warns you and asks you if you want to eject all volumes on the device whenever you eject one of them. Anwser "Eject All" unless you do not plan to disconnect the drive.
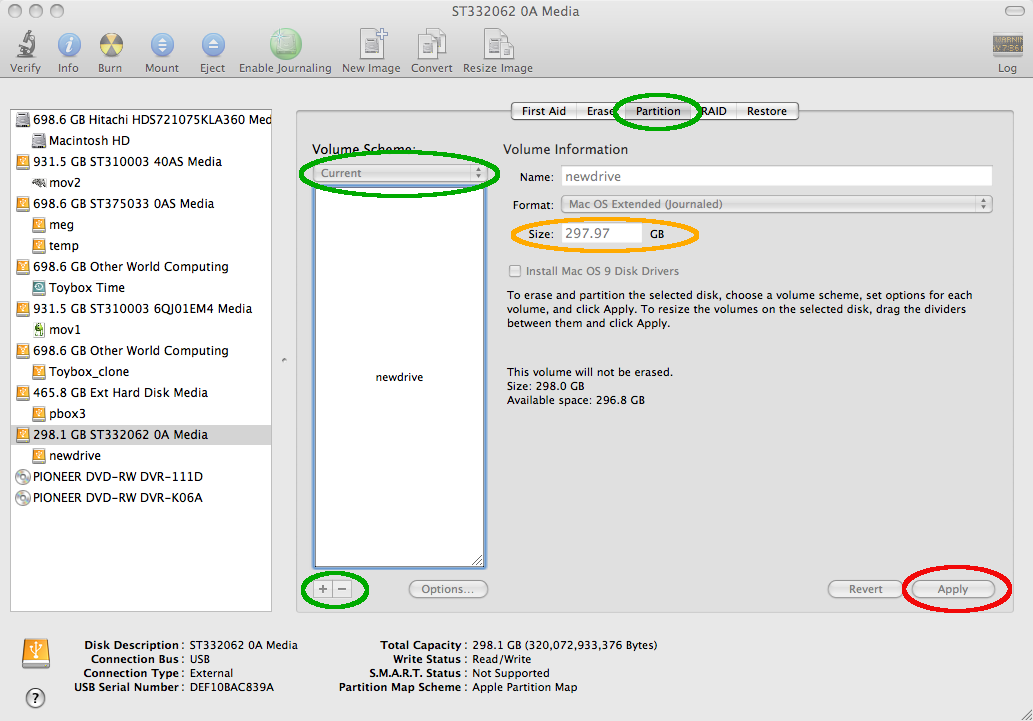
One Logical Volume
If you only want one logical volume, then after you have clicked Partition at the top of Disk Utility you'll see a page like this.
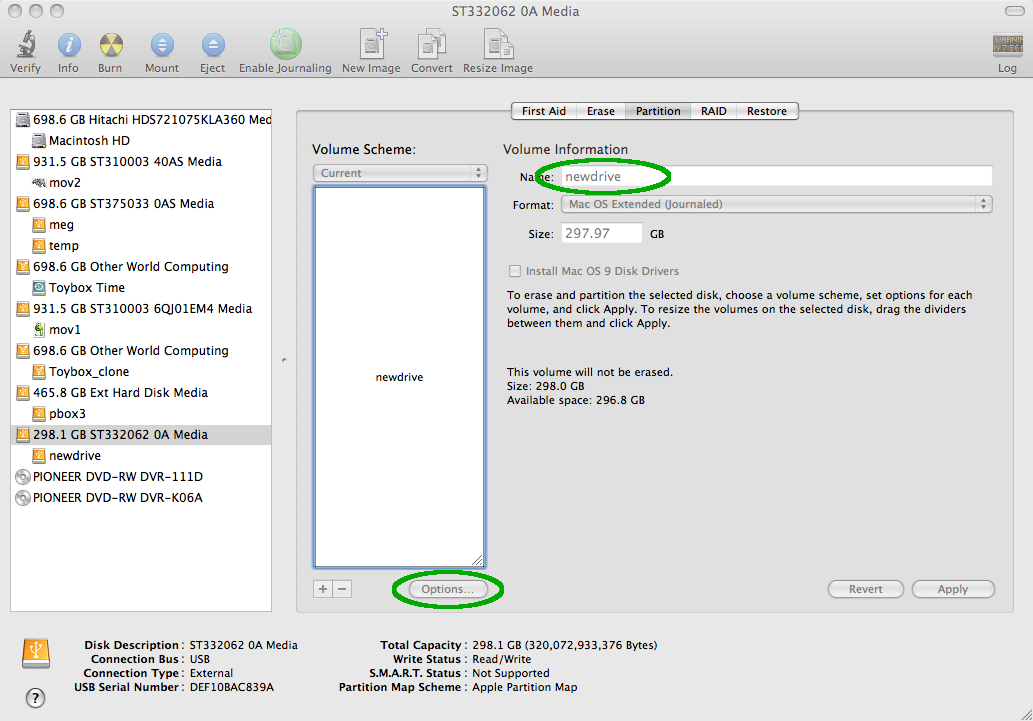
Give the disk a name and then click "Options" at the bottom of the page. It pops up an action sheet that looks like this:
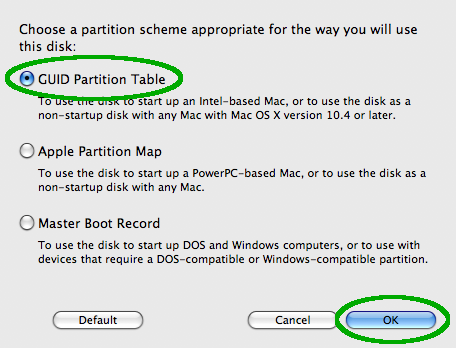
If you have an Intel Mac, choose GUID partition. If you have a G4 or G5 Mac choose the older Apple Partition Map. Then click OK.
Take a moment to be absolutely certain you are initializing your new drive and not some other drive already connected to your computer. When you're certain, click "Apply."
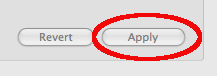
You will be prompted to confirm.

Finally, click "Erase" on the confirmation popup to begin initializing the disk.
When the initialization is complete you may quit Disk Utility and begin using your external drive!
You can ignore the rest of this article -- you're done.
Partitioning Your Hard Drive (Multiple Logical Volumes)
If you choose to divide your external hard drive into multiple logical volumes then after you should click the "Partition" tab at the top of Disk Utility. You will see something like this:
You can select how many partitions you want the drive to contain in the Volume Scheme menu, or you can click the small + and - icons under the column of partition rectangles to add and remove partitions.
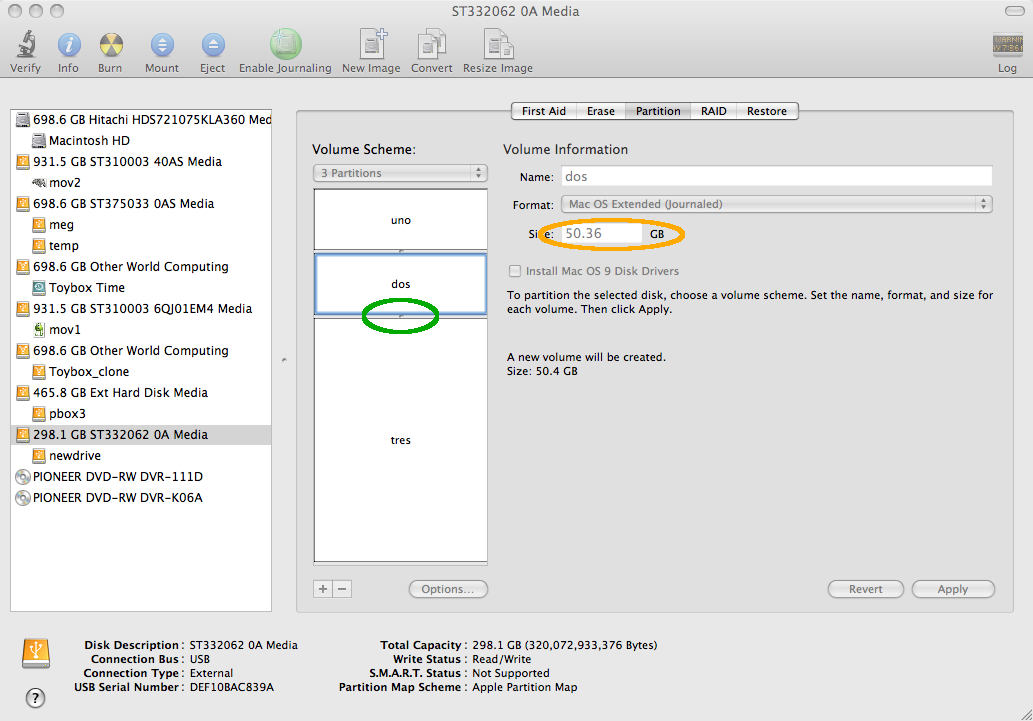
Here is what it looks like with three equal partitions:
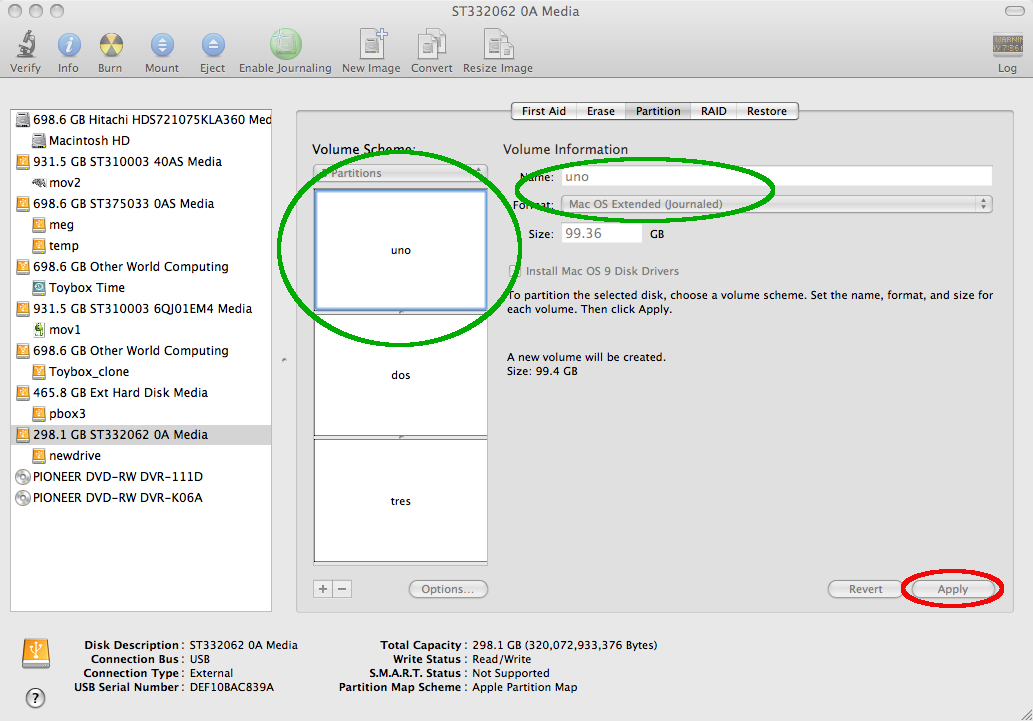
Each partition must have its own name. Select a partition and type in its name. Select the next partition and give it a name, and so on until all partitions have a name.
You may adjust the size of partitions by dragging the border between them, but you'll find that dragging them affects the size of other partitions. I usually begin by dragging the bottom parition border all the way down as far as it goes, and then I do the same for the next partition border up from the bottom, and so on until all borders are as close to the bottom as possible. Then adjust the size of the top partition. Then adjust the size of the second partition, and so on until all parititions have the size you wish.
Then click "Options" at the bottom of the page. It pops up an action sheet that looks like this:
If you have an Intel Mac, choose GUID partition. If you have a G4 or G5 Mac choose the older Apple Partition Map. Then click OK.
Take a moment to be absolutely certain you are initializing your new drive and not some other drive already connected to your computer. When you're certain, click "Apply."
You will be prompted to confirm.
Finally, click "Erase" on the confirmation popup to begin initializing the disk.
When the initialization is complete you may quit Disk Utility and begin using all the volumes on your external drive!
All content copyright Howard Cohen 2010 , all rights reserved worlwide.

hoco(at)timefold(dot)com