<--Previous Up Next-->
Making the Wood Deck
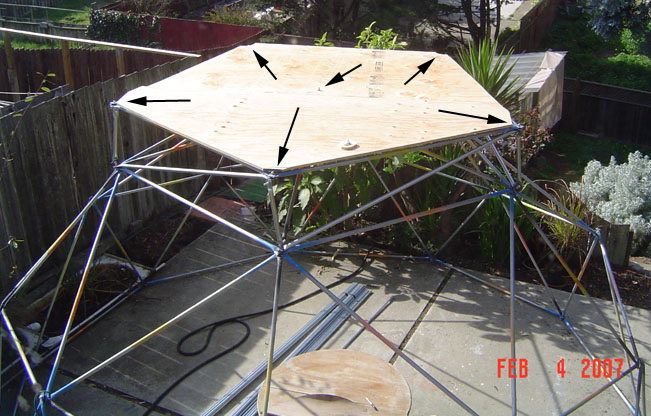
Above you can see the completed wood deck. Here are instructions
for how to make it.
One of the key concepts for the deck is that the verticies at the top
of each riser are not covered by wood. They are exposed so you
will be able to attach an angle bracket to it to hold the 1v shade dome
on top.
The instructions below assume you have a 2v optimal dome. If your dome
is bigger or smaller, you'll have to improvise.
- Place one of the two sheets of 5/8" plywood on top of the deck.
- Slide it into position so that all the following are true:
- One long edge is a few inches from the center bolt.
- Each of the two short edges is the same distance from a deck
pentagon vertex, and neither is covered by the plywood.
- The other long edge of the plywood is about 1.5" from the
deck pentagon vertex that lies between the two verticies that now
are very close to the short edges of the plywood.
When all the above conditions are met, that sheet of plywood is in the right
spot.
- Clamp that sheet down so it won't slide (or else be very careful not
to move it when you do the following steps.
- Place the other sheet of plywood onto the deck.
- Adjust its position so that one long edge exactly aligns with the long
edge of the other sheet you just placed. Of course, the center bolt will be
sticking up and will keep you from laying it flat. You could lower that bolt,
or you could just live with the fact that it doesn't lay flat for the moment.
Do your best to align the long edges, so that if there was a hole for the
bolt to go through, the two sheets would exactly meet.
- Climb down. Bring a step stool into the dome and stand on it so you
can trace the outline of the dome deck onto the bottom of the two sheets
of plywood.
- Mark where the center bolt goes. I put a 1" circle centered on the
bolt.
- Mark where the two verticies are on the sheet that covers the center
bolt. Mark those verticies so you can cut some plywood away from them to
expose the verticies.
- I cut the plywood with a jigsaw while it was sitting on the dome deck
by staying aware of where the struts were, and moving the plywood so that
the jigsaw blade never contacted any struts. I also had to remain aware of
where the struts were so that I didn't lose my ballance or step on an
unsupported part of the deck. If you're not comfortable working in such
a precarious position, bring the plywood sheets down and cut them on
sawhorses or by placing scrap wood under them so there is clearance for
the jigsaw blade.
- Use a drill to make a hole for the center bolt.
- Use the jigsaw to cut the space for the two verticies in the sheet
with the center hole.
- Place the plywood deck sheets back into position and verify that the
five verticies at the top of the risers are exposed. Attach an angle
bracket at the top of each of these verticies, to be sure they will fit
and to be ready for building the 1v shade dome.
- Optional: cut
handholds
around
the permiter of the dome deck, and use a router on the edges to make them
smooth.
Click here
for step-by-step instructions.