| Below is a long discussion of concepts and techniques that were
developed while assembling the Desert Nose project. But
first a little context. Also, if you haven't already
read the Building a Model page, I think it would be a good
thing to do first.
The nose calculator predicts the lengths of struts assuming
that the struts essentially meet at a point. In fact,
they don't. The Desert Nose has its "Booger Joint", where
14 struts join together from all kinds of different
directions. So, the nose calculator is "wrong" in that
you actually can't assemble the struts the way it assumes.
But, in fact, the structure will be rigid if it is
designed right, even if the struts meet in a region
instead of a point. One way of thinking about this is to
envision a sphere about 4" in diameter whose center is
the "point" where the struts are supposed to meet. You
can imagine that in addition to the center point, there
is also a circle on that sphere where that strut can also
be placed and still be the same length.
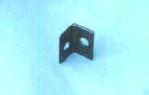
Enter the L-bracket. The L-bracket adds a 90 degree bend
at any vertex, and the 90 degree face can be rotated
through 360 degrees to be convenient for other struts which
need to connect at that vertex.
The L-bracket gives you a lot of flexibility. Some of the
verticies in the Desert Nose needed two L-brackets,
including the Booger Joint. The L-bracket allows you
to join planes. The Desert Nose was based on filling
in triangles to support some longer sweeping pieces which
defined the overall shape of the nose. So there were some
basic planes alread built in. The deck was one plane,
but it met at 90 degrees with two planes (one on each side)
which supported the tip. The L-brackets made these joints
easy to make.

Photo by the Bonitas
click for larger view

Photo by the Bonitas
click for larger view
To make the L-brackets I cut 1.25" x 1/8" angle iron into
2" sections and drilled a hole near the edge of each face
centered in the 2" length of the material. I ground the
edges and ran them through a wire wheel so they didn't have
any sharp edges left.
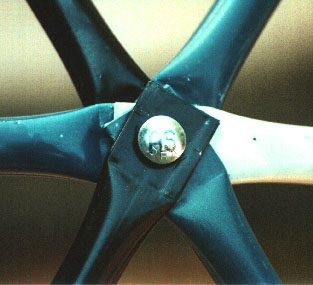
There was just enough room for a carriage bolt to go
through each hole. It was also possible to have the head
of one carriage bolt and one nut "inside" the L-bracket.
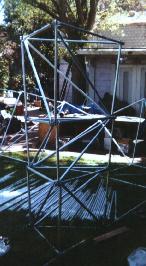
On the nose, the back was mostly like a dome -- a convex
strutcture which pretty much stands up on its own. But
the area around the deck and over the deck was a 3-dimensional
structure which supported a concave extiorior (where the
nostrils meet the tip and the side of the nose).
Wherever the structure becomes "3-d" it becomes more
complex and it is harder to get those struts to meet.
The L-bracket give you some freedom, but you have to
be careful not to create a "problem" by effectively
changing the length of a strut.
Here's a metaphor. Imagine you're holding a pool cue
and you're going to use it to flip a light switch from
five feet away. After you get the tip under the switch,
the motion to activate the switch is just up and down --
not in and out. Remember the 4" circle? There is a 4"
circle around where one end of a strut meets which
doesn't change its length more than a negligable amount.
There are also a couple of points in the sphere which
change the effective length of the strut by 2". You
can avoid problems by avoiding changing the effective
length of a strut.
That said, it is safe to adjust the length of some
struts -- just not the ones involved in a 3-d structure.
So, it was safe to make a few of the top-most struts in
the nose a different effective length because all that
happened was that some rigid structure had a slightly
different shape. But nothing depended on the way that
shape looked -- as long as it was rigid. So, whatever
fit was fine. These areas seem always to be on the
"outside" of the structure and never on the "inside".
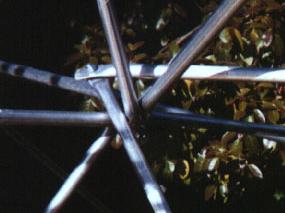
Photo by the Bonitas
Struts meet in anything but a perfect manner. There is
a trade-off between flattening the end further, making
the struts easier to assemble, and the strength of
the end. A long flat end works fine of the strut is
under tension (being stretched), but doesn't work well
if the strut is under compression (being crushed).
If one was building a completely flat sheet of triangles
then all the struts would be in the same plane and they
could essentially meet at a point too. But since the
Desert Nose is made of curves the struts don't meet in
the same plane.
When struts don't meet in the same plane, but the planes
are fairly close to each other, then the ends of the struts
can simply be bent so the strut ends are flat against
each other. This works up to about 30 degrees pretty
well. The ends get weaker from 30 to 45 degrees. I found
that when the joint reached even 30 degrees it was possible
to use an L-bracket by bending the strut in the "other"
direction.
I didnt' start needing L-brackets until I started
building the septum, which had some struts meeting at
90 degrees with the top of the deck and 90 degrees
with the front of the septum vertically and horizontally!
All three dimensions essentially meet at one vertex on
each side of the front of the deck.
So, I'm going to confess here that septum had to be built
twice. The first time seven struts were the wrong length
due to a bug in the nose calculator. When I built the
septum the first time it was essentially like an
equliateral trangle dragged upwared -- like the mirrors
in a kalaidoscope standing on end. I bent the end of each
strut to the "average" of the two planes where each
of the "mirror" sections met. So the struts all pointed
out from each vertex in one, sharp chunk, which was in its
own plane.
click for larger view
This turned out to be a bad thing.
It was very hard to get the septum together because
each strut really had to be bent to the right angle or
it would fight the assembly process.
I found it was much easier to assemble if I looked at
the struts and picked a collection that were more or
less in one plane. Then figured out how to attach the
rest. IN the entire Desert Nose only a few joints needed
two L-brackets, although many more needed one.
So the second time I built the septum the pieces made
it wider, so it wasn't an equilateral triangle any more.
I decided to favor the vertical plane of the front of
the septum. The pieces in the same plane met without
being bent. The struts from the other two planes had
to be bent to make up the entire angular difference between
the planes. But it went together much, much easier because
the ends of all the pieces in the same plane didn't need to be
bent so they were already perfectly aligned.

click for larger view
I often found myself "unbuilding" a vertex to rearrange the
struts so they would sit better. Even among struts in the
same plane, some angles fit better than other. If two
struts meet at 180 degrees (e.g. they lie on a line and
only one of each of their ends touch) then there is a
point where the very end of one strut bumps into the "hip"
of the other strut -- which is where the flat part
transitions into the unflattened pipe.
So, meeting at 180 degrees might mean that you need to
flatten then ends a bit more, so the hips are clear of the
flattened end of the other strut.

Photo by the Bonitas
click for larger view
Meeting at 90 degrees in the same plane is easy and is
perhaps the best case since the hole is near to the side
of the flat part of a strut and a longer way from the
end of the flat part.
Meeting at 90 degrees in a different plane would require
an L-bracket. But
depending on where the other struts are coming from you
may find that you need to cut off the corner of the flat
end of the strut, or cut about 1/4" off the flat end,
reducing the material between the edge and the hole,
but allowing it to fit on one face of an L-bracket without
poking out past the edge of the bracket to interfere with
struts attached to the other face. |