Once the struts are built you assemble the dome by using
3/8" carriage bolts. The struts should be painted to
both color code the different lengths as well as protect
them from rust.
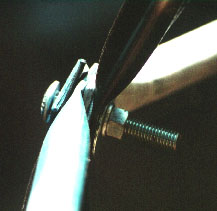
This is a side view of the strut connections. I used
2.5" long carriage bolts, which left about 1" sticking
out inside. But you need some of that extra length to
simplify assembly. In my dome there is little chance of
bumping your head on these, but if your dome is a different
size they might end up at head height. In which case
you might want to drill a 1/4" hole in a tennis ball and
push it onto the inside to protect people's heads.
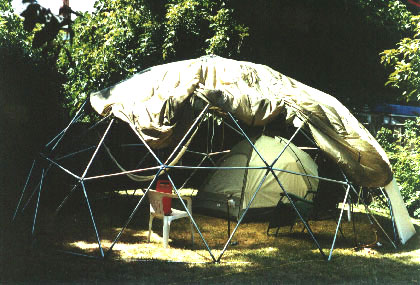
The finished dome, covered with a parachute. You can
see my tent inside, and some chairs. My dome is 20' in
diameter and about 8.5" tall.
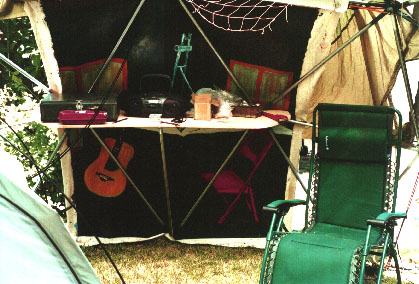
This is a view inside the dome, looking at a large painted
canvas which I have attached quite securely to the outside
of the dome. The painting is of a chair, guitar, an
easle and two windows. It was painted by Florentino
Mendiola, an old friend of mine.
In front of the painting is a shelf supported by one
custom-length strut. It attaches to two vertexes using
a carriage bolt and a strip of steel with 3/8" holes for
each. You can see my campstove and boombox on the shelf.
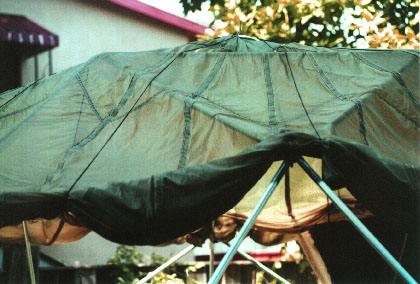 This is a closeup of the parachute canopy. You can see
two black lines. These attach to the top/inside of the
dome down the outside of the dome under the parachute.
Then they slip through a reinforced hole at the edge of
the parachute and back up to the top of the dome on the
outside of the parachute. At the top they all go through
a single 4" diameter steel ring and down inside the dome
through a hole in the top of the parachute.
This is a closeup of the parachute canopy. You can see
two black lines. These attach to the top/inside of the
dome down the outside of the dome under the parachute.
Then they slip through a reinforced hole at the edge of
the parachute and back up to the top of the dome on the
outside of the parachute. At the top they all go through
a single 4" diameter steel ring and down inside the dome
through a hole in the top of the parachute.
The end result is that the parachute can be raised up
to "daytime mode" (as these photos show) simply by pulling
on all the lines. In practice it takes effort to keep the
lines from getting tangled. There are 15 lines, and they
correspond to the 15 bottom vertexes of my dome.
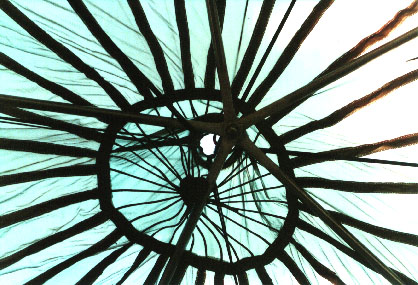
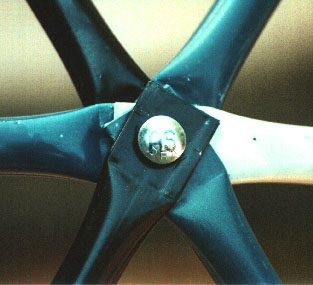
Looking up at the center of the top of the dome you can
see five struts meeting. I actually used a 8" carriage
bolt for this very top junction. It sticks out about 7"
above the top of the dome and keeps the steel ring from
sliding down the side of the dome. Most of the
lines and wide strips are just part of the parachute.
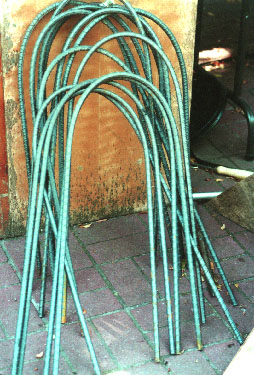
These rebar stakes are made by bending a 5' section of
1/2" rebar into a U shape. Rebar comes in 10' lengths,
so I just had to cut them in half. I used a hacksaw
for this -- it took about 100 strokes per cut. I made
15 U-stakes, one for each bottom vertex of my dome.
If that seems like overkill, consider that at Burning Man
there can be gusts of up wind that exceed 60 miles/hour!
When you consider that my dome might have the parachute
covering it at the time, there is a lot of force
from the wind on the dome. My dome is a 3/8 dome so it
presents a lower profile to the wind, which also helps.

Previous |